Happy Tidy Tuesday friends! Today we are tackling an area of the house that I know so many people struggle with (mainly because you’ve told me so and because the name says it all). It may be in your kitchen, nightstand, bathroom, etc. but no doubt everyone has one. That’s right….today I’m bringing you my tips and tricks for how to organize the junk drawer! Keep reading for the best choregasm of this space (aka the satisfying before and afters).

The junk drawer can be daunting because, well, it’s filled with random and loose things. So, that is why here more than ever you need to utilize bins. And listen it doesn’t have to be fancy. In the past I have used cardboard boxes. It’s whatever works for you and your budget and space but if you can do plastic bins I highly recommend them and I like to color coordinate if possible. Okay, so let’s look at my junk drawer before and see what we are working with.

Starting with the first junk drawer, you can see that it’s just sort of a random mess and most likely the items are always shifting around in there. Not to mention there is no home base for anything. It’s all just sort of tossed in there. My rule is that everything should have a home, which is why bins come in handy because then even a small or loose item can have a home.
So, where do we begin? My very first tip for how to organize the junk drawer, that can really apply to any areas you are tidying up is to…
Empty out the drawer completely!
Take everything out, go through it all, toss what you don’t need or use, sort like with like, then wipe down the drawer and if you still need some bins or compartments, measure the drawer. This leads to my next tip…
Measure first. Buy second.
There is nothing more annoying then being at the store to buy your bins or trays only to wonder how many you need and which configuration to go with. So always measure the space first then take the measuring tape with you and maybe a picture on your phone of the empty drawer, so you can have a visual of how it will look (hell lay them out on the floor of the store if you need to) before you buy. This leads to less returns and less being stuck with things you won’t use if you fail to return them.
Okay, so let’s put it all together. Keep in mind there are a hundred ways to organize this space, but this is the best way I have found to organize the pesky junk drawer.

Here is my after picture of this first drawer. As you’ll notice with most of my organizational posts, I use pink where I can. Our kitchen is white with baby pink accents so when I found these bins at Home Goods (and by found at Home Goods I mean I hit up 4 different locations spread out around Cincinnati) I snatched them up! They are by Madesmart and come in a multitude of colors and can be found nearly anywhere.
I intentionally left the area on the left bin-less because that’s where we keep coupons we get in the mail for various stores and I couldn’t find a bin to fit them flat so instead I went with pink folders.
As you can see there is a bin for the pens, the one I’m placing is for notepads, and then the sectional one in the back is perfect to house return address labels, stamps, grocery coupons (that’s what’s in the small pink pouch), some rubber bands and sharpies. Here’s the finished choregasm.

I like to leave some space between bins when I can because it makes it look more tidy and uniform. That’s not always possible in a drawer with bins but if it is I take advantage of it. You want enough space for it to look tidy but not so much space that you are wasting precious storage real estate.
Okay, let’s look at the second drawer. Here’s the before.

Again, just really a loose hodgepodge of things, but not hopeless. It just needs compartmentalized and everything needs it’s own space. So again, I took everything out and went through it. I had a bunch of old chargers that I didn’t even know what they went to, so I pitched them. Clearly I haven’t used them in a year which means I must not even use that device, so bye.
After I sorted through everything and knew what I was keeping and how I wanted to organize it all I measured and grabbed my bins. Which leads to another tip….only have in the drawer things you will use in the space and need to grab in a pinch. Here is the after choregasm.

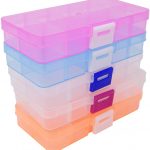
Again, I went with the pink theme so it’s all cohesive (but don’t feel like you have to do this). Another option if you do want a color scheme but can’t find trays or bins in the color you want? Buy clear bins and line your drawer with paper the color you desire. Measure the draw and then cut the paper to those measurements, then secure it down with double sided tape and then place the clear bins on top! Here are several to choose from.
I love the trays with the sections. As you can see here I gave the batteries their own section. I like having batteries out of their packages so I can see what I have but also so I can just grab one when needed. Gift cards get their own home because if I don’t know where they are I will most definitely forget to use them. Ugh, that’s the worst! And then the command hooks, tape, measuring tape, really just any of the things I use on a regular basis are housed in here too.
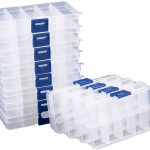
Finally, you’ll notice the far right bin still has random items it in but they are contained to one space and not rolling all over the draw which is the real win in all of this. If you have a bunch of tiny items (thumbtacks for example or something of that size) I would use a container with compartments and a lid. Almost like a mini tackle box. Here are some examples.
Now, the key to organizing the junk drawer is ….
Keep it free of junk!
As in, tidy it often and be mindful of what you toss in there. In a perfect world you could organize once and be done, but random things always inevitably find their way in there when we are in a hurry or guests are coming over and we are shoving things in drawers, and it’s a messy junk drawer once again. So, the key is to tidy it often. Listen, my junk drawers fill up again too but I just make it a priority every so often to go through it and tidy it. You could even make it something you do every Sunday when you are preparing for the week ahead. Organize once. Tidy often. That’s the name of the game.
Lastly, I have to show you a recent discovery I found (that I can’t believe took me so long to discover) that is a total game changer for bins in drawers.

There is also a product called Museum Gel that I’m told works great too, but friends this putty is where it’s at! I can’t stand when bins or the utensil holder shift within the drawer. With this putty you simply put a few pieces on the bottom of the bin or tray (I do top and bottom but you could do corners) and voila! It doesn’t move at all. Mind. Blown.
In addition to the putty, below are some of my favorite organizational products for the junk drawer. Just click the picture to shop and note they are connected to affiliate links which means I earn a small commission when you shop them.


Alright friends, that does is for this week’s Tidy Tuesday! I hope you found some useful tools for how to organize the junk drawer(s) in your life. Thanks for stopping by!
Jill