
Happy Wednesday friends! Or should I say, happy wellness Wednesday because today I’m sharing with you a much sought after recipe for a very popular, all natural, cold and flu remedy this time of year that I hear is a must have to have on hand. It could also be considered wellness Wednesday because my recipe comes from The Wellness Mama herself, Katie Wells! When I asked around on social media for homemade elderberry syrup recipes everyone kept pointing me to her, and I’m so glad they did! Aside from this easy, great recipe, she has so many other awesome clean lifestyle recipes, information, etc. over on her site.

So, before we get to the recipe, let’s talk elderberries and why elderberry syrup! I honestly hadn’t heard of elderberry syrup prior to having Leyton. But, after I had him I went into full on clean living mode (hence the start of this blog) and was really interested in all natural ways I could keep he (and Eric and me) healthy. As a former pediatric ICU nurse I have seen my share of sick little babies and want to do all I can to keep Leyton from being one of them, God willing. Now, full disclaimer, I know this isn’t guaranteed to keep him from getting sick, nor is it guaranteed to cure him if he does, but you know me….I like to be preventative, and I love me an all natural hack when I can get it.
In my research for ways to keep his immune system up as we head into cold and flu season and the winter months, I kept hearing about elderberry syrup and its incredible immune boosting properties. These little berries are powerful! They are high in flavonoids (which give them their deep dark color). And not to get all science-y on you but basically flavonoids are anti-oxidants known for being anti-viral, anti-bacterial, anti-cancer, and anti-inflammatory just to name a few. All the blogs, forums and sites I read kept talking about how beneficial elderberries are to our health and how we should have a little elderberry syrup every day. Many people feel it wards off colds and the flu. It’s also believed that if you get sick and take some, it cuts down the number of sick days drastically. All of this sounded good to me! So I set out to make my own, in hopes of keeping our immune systems up this winter!
OH and best yet…..you can use this like regular syrup! As in….on your pancakes! Did pancakes just become healthy?? Looks that way to me!
**Now, a few things to mention before getting to the recipe.
- As with anything if you have any concerns about taking this syrup, check with your Doctor first, especially if breastfeeding, taking medications, etc. It’s all natural, but even all natural things can have restrictions and interactions with medications.
- This recipe calls for honey, however, I plan on giving some to Leyton and babies under 1 year cannot have honey. I have substituted maple syrup in its place.
- There are several elderberry syrups out there for purchase. If you find a reputable one then by all means you could use that. I decided to make my own because A. then I fully know what’s going into it and B. I was worried pre-made ones would contain honey, and again that’s a no go for Leyton.
- If planning to give to children, consult your pediatrician first to get the okay. I have spoken with many people on social media who have given it to their babies and children, but I will be checking with Leyton’s Doctor at his next appointment before giving him any, just to be sure.
- So as with anything, do your own research and ask your doctor any questions before getting started.
Okay, lets get to this yummy, easy to make goodness. So for starters you need elderberries! I purchased mine off of Amazon and I will tell you, they can be pricey (sometimes they are and sometimes they aren’t, maybe it’s a seasonal thing?). BUT, I will say you get one pound of dried berries and the recipe only calls for 2/3 cup, so this bag will last you and will make several batches of syrup. You can freeze the berries, or they should keep for a long time stored at room temperature. Here are the ones I purchased….

*Again, just to properly give credit where credit is due, this recipe comes from Katie at The Wellness Mama. I would love to say I crafted this up on my own, but I did not. I did google “Wellness Mama elderberry syrup” if that counts for anything :). The complete recipe is at the bottom, but if you are more of a visual person like me, here is a step by step breakdown.
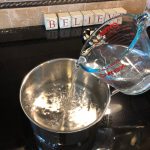
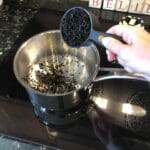
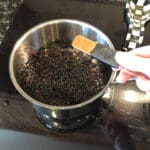
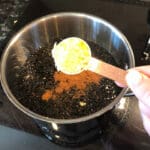
First you are going to add to a medium sized saucepan 3.5 cups of water, 2/3 cups of dried elderberries (1 1/3 cups if using fresh or frozen), 1 tsp of cinnamon, 1/2 tsp of cloves and 2 TBSP of ginger root (she calls for mincing the ginger, I saw that after I made the recipe and grated mine. Not sure if it makes a difference). Once added to the pan, give it a good stir and bring to a boil.

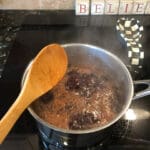
Once it begins boiling, reduce heat and cover and allow to simmer for 45 minutes to an hour. However long it takes to reduce it by almost half. For me, it took about an hour and 10 minutes.

Once it’s finished simmering and has reduced, take it off of the heat and allow to cool down some. You don’t want it to get cold just cool enough to work with. Next, you will take a spoon and mash the berries.

Once you’ve mashed the berries a good bit pour it all through a strainer into a glass bowl or dish, then toss the berries. Allow this to cool down to lukewarm temperature then add in your cup of honey, maple syrup, or molasses. Then give it a good stir and voila! That’s it!

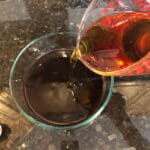

Transfer to a mason jar or some sort of glass container and place it in the refrigerator. Now, according to Katie the syrup should keep in the refrigerator for a week or more (I’ve read some people get as long as months), but keep an eye on it because it can become moldy. Katie says try not to skip the sweet ingredient (honey, molasses, or maple syrup) as that is what extends its shelf life. I put some in the refrigerator and froze the rest, so you could easily make several batches and freeze a bunch.
The recommended dose for adults is up to 1 TBSP a day for immune support (Katie recommends just during the week and taking the weekend off) and then, 2-3 times a day if sick or if you feel sickness creeping in. For kids, I’ve seen recommended 1/4 – 1/2 tsp up to 1 tsp a few times a week and also 2-3 times a day if sick. Also, a good point to make….don’t ever eat the dried elderberries as is. They must be cooked to get rid of some toxic ingredients they contain when raw.

Okay friends, so that’s it! Be sure to let me know if you make this or if you’re already a believer in the power of elderberries! Oh, and if syrup isn’t your thing, Katie has several other recipes containing elderberries here. Here’s to a wishing everyone a healthy winter!
Here is the full recipe:
Homemade Elderberry Syrup

- 3 1/2 cups water
- 2/3 cup dried elderberries (or 1 1/3 cups fresh or frozen)
- 1 tsp cinnamon
- 1/2 tsp cloves or clove powder
- 2 TBSP Fresh or dried ginger root
- 1 cup honey (or may substitute maple syrup or molasses)
- In a medium sauce pan add water, elderberries, cinnamon, cloves, and ginger and stir to combine.
- Bring mixture to a boil then cover an reduce heat. Simmer for 45 minutes to an hour until the liquid has reduced by almost half.
- Remove from heat and let cool to a temperature that is cool enough to be handled.
- Using a spoon or flat utensil, mash the berries.
- Pour through a strainer into a glass bowl and discard the elderberries.
- Allow liquid to cool to lukewarm then add the honey/maple syrup/molasses, whichever you used, and stir.
- Transfer syrup to glass mason jar or 16 oz. glass container of some kind.


One thought on “HOMEMADE ELDERBERRY SYRUP”